반응형
tvOS에서 좌우로 화면을 분할할 수 있습니다.
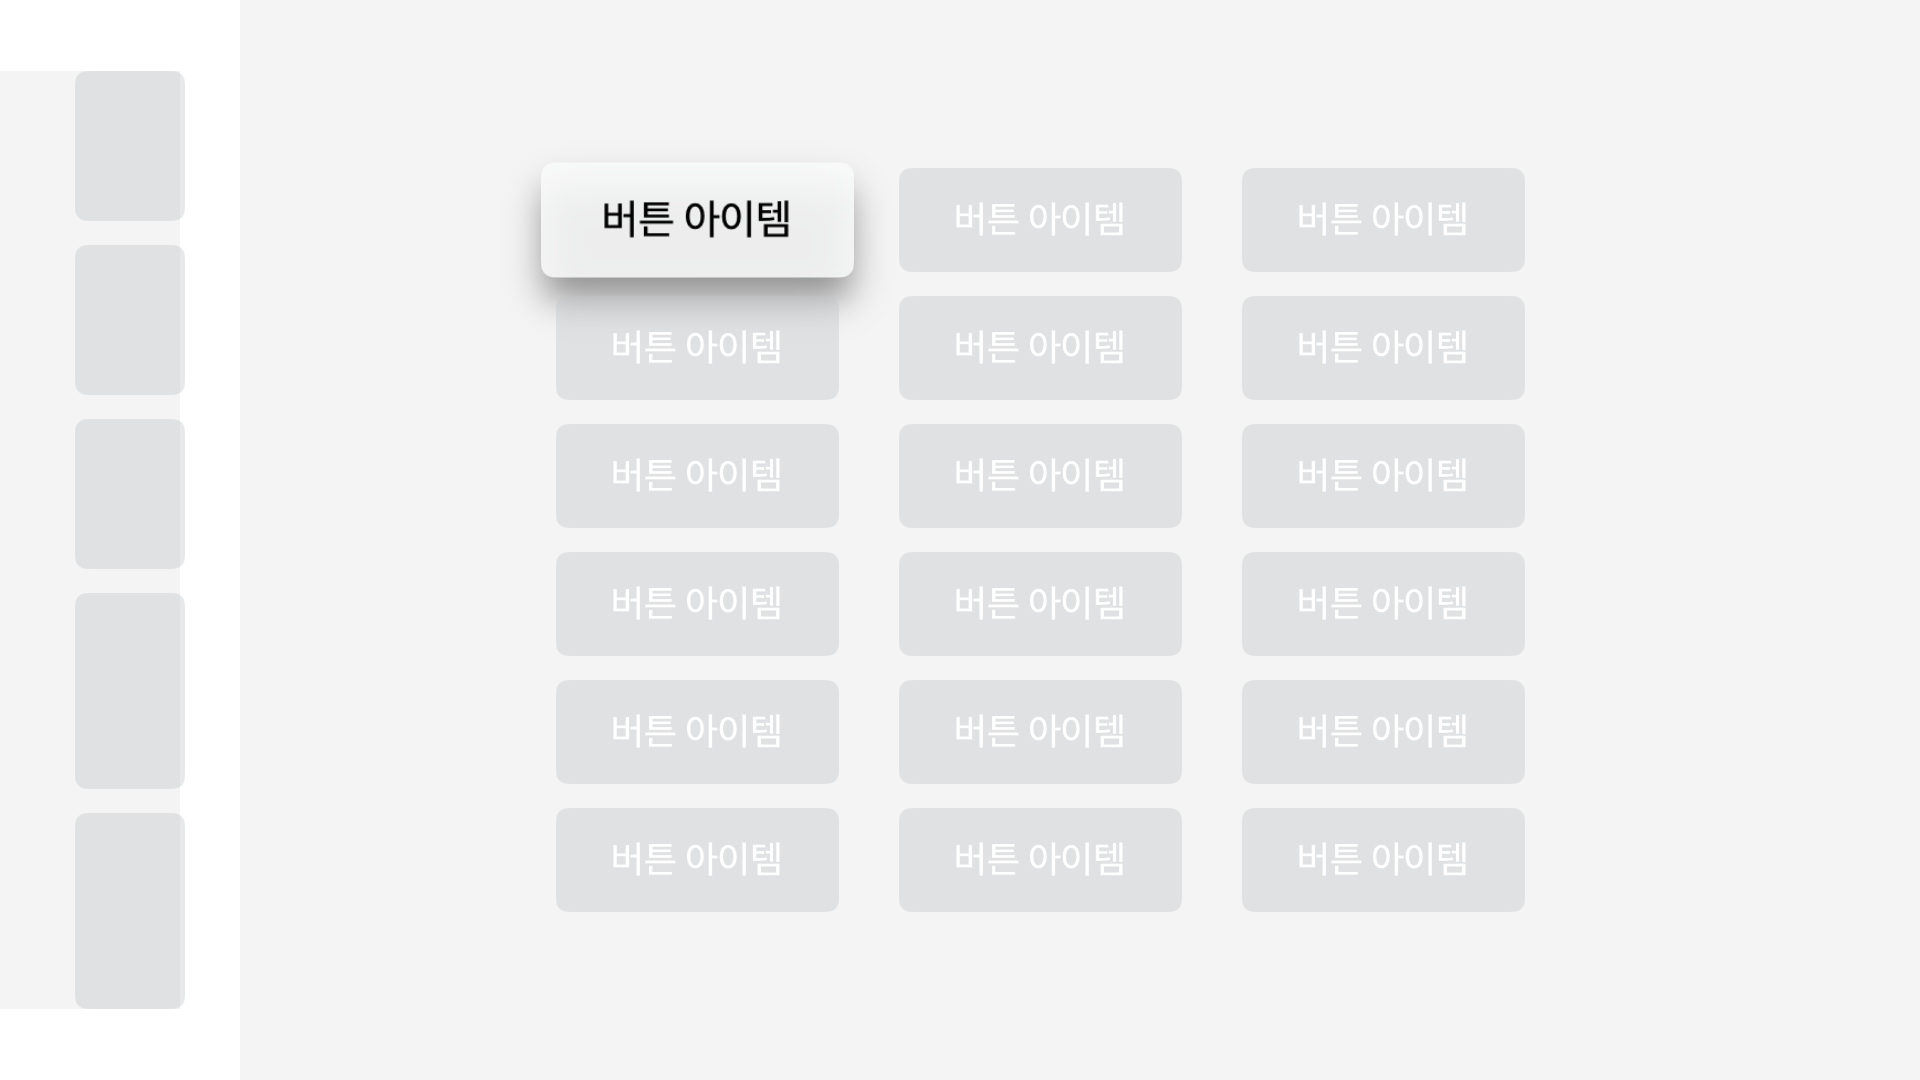
뷰 내 두개 뷰를 포함해서 작업할 수 있습니다. 그리고 좌우 뷰 포커싱에 이벤트를 받아서 처리할 수 있습니다.
이 경우 오른쪽 뷰에 포커싱이 갔을때 왼쪽 뷰 폭을 줄입니다.(그림 2.) 그리고 다시 왼쪽 뷰로 포커싱되면 원래 크기로 폭을 늘립니다.(그림 1.)

소스 코드
import SwiftUI

struct ContentView: View {
    @State private var leftViewWidth: CGFloat = 300

    var body: some View {
        HStack {
            // 왼쪽 뷰
            LeftView(onLeftButtonTap: {
                // 포커싱이 발생하면 왼쪽 뷰 크기를 조절
                withAnimation {
                    if(leftViewWidth == 100) {
                        leftViewWidth = 300
                    }
                }
            })
            .frame(width: leftViewWidth)
            .background(Color.gray.opacity(0.1))

            // 오른쪽 뷰
            RightView(onRightButtonTap: {
                // 포커싱이 발생하면 왼쪽 뷰 크기를 조절
                withAnimation {
                    if(leftViewWidth == 300) {
                        leftViewWidth = 100
                    }
                }
            })
            .frame(maxWidth: .infinity, maxHeight: .infinity)
            .background(Color.gray.opacity(0.1))
        }
        .background(Color.white)
    }
}

struct LeftView: View {
    @FocusState private var isFocused: Bool
    var onLeftButtonTap: () -> Void

    var body: some View {
        VStack(alignment: .leading) {
            Button(action: {
                print("왼쪽 버튼 클릭")
            }) {
                Text("버튼 아이템")
                    .padding()
            }

            Button(action: {
                print("왼쪽 버튼 클릭")
            }) {
                Text("버튼 아이템")
                    .padding()
            }

            Button(action: {
                print("왼쪽 버튼 클릭")
            }) {
                Text("버튼 아이템")
                    .padding()
            }

            Button(action: {
                print("왼쪽 버튼 클릭")
            }) {
                Text("버튼 아이템")
                    .padding()
            }

            Button(action: {
                print("왼쪽 버튼 클릭")
            }) {
                Text("버튼 아이템")
                    .padding()
            }
            // 추가적인 버튼들...
        }
        .focused($isFocused)
        .onChange(of: isFocused) { oldState, newState in
            // 포커싱이 변경될 때의 동작
            if newState {
                print("왼쪽 뷰에 포커스가 맞춰졌습니다.")
                onLeftButtonTap()
            }
        }
    }
}

struct RightView: View {
    @FocusState private var isFocused: Bool
    var onRightButtonTap: () -> Void

    var body: some View {
        VStack(alignment: .leading) {
            HStack(alignment: .top) {
                Button(action: {
                    print("오른쪽 버튼 클릭")
                }) {
                    Text("버튼 아이템")
                        .padding()
                }

                Button(action: {
                    print("오른쪽 버튼 클릭")
                }) {
                    Text("버튼 아이템")
                        .padding()
                }

                Button(action: {
                    print("오른쪽 버튼 클릭")
                }) {
                    Text("버튼 아이템")
                        .padding()
                }
                // 추가적인 버튼들...
            }
        }
        .focused($isFocused)
        .onChange(of: isFocused) { oldState, newState in
            // 포커싱이 변경될 때의 동작
            if newState {
                print("오른쪽 뷰에 포커스가 맞춰졌습니다.")
                onRightButtonTap()
            }
        }
    }
}

struct ContentView_Previews: PreviewProvider {
    static var previews: some View {
        ContentView()
    }
}
# tvOS 17에서 테스트됨
반응형
'프로그램 개발해서 돈벌기 > iOS' 카테고리의 다른 글
| [Swift] SwiftUI에서 두 개 뷰에서 @Published, ObservableObject, @StateObjec, @EnvironmentObject를 이용한 데이터 Combine 사용하기 (0) | 2023.11.23 |
|---|---|
| SwiftUI에서 Class와 Struct 특징 및 차이점 (0) | 2023.11.22 |
| 메모리에 표시되는 값 형식과 참조 형식 (0) | 2023.11.19 |
| 메모리 개념과 사이즈 용어 및 메모리 영역별 사용처 (0) | 2023.11.19 |
| SwiftUI에서 그리드 아이템을 한꺼번에 보여 주지 않고 12 개씩 나누어서 보여 주기 (0) | 2023.11.13 |


댓글